blok
The Blok is a Raspberry pi RP2040-based microcontroller. Below we will go over everything you need to know about it.
Unlike other RP2040-based microcontroller the Blok come pre-flashed with Boardsource-python (fork of CircuitPython) This allows for easy setup with Peg or KmK. If you need to reflash your version of Boardsource-python you can download it here or play around building your own.
Just because the Blok comes pre-flashed with Boardsource-python it does not stop you from running any code you want. To run QMK or any other code you will just need to hold down the boot button ( or short boot pin to gnd) while you plug in the Blok. When you do that a new "drive" should pop up on your computer named "RPI-RP2" There you can drag and drop any .uf2 file you want.
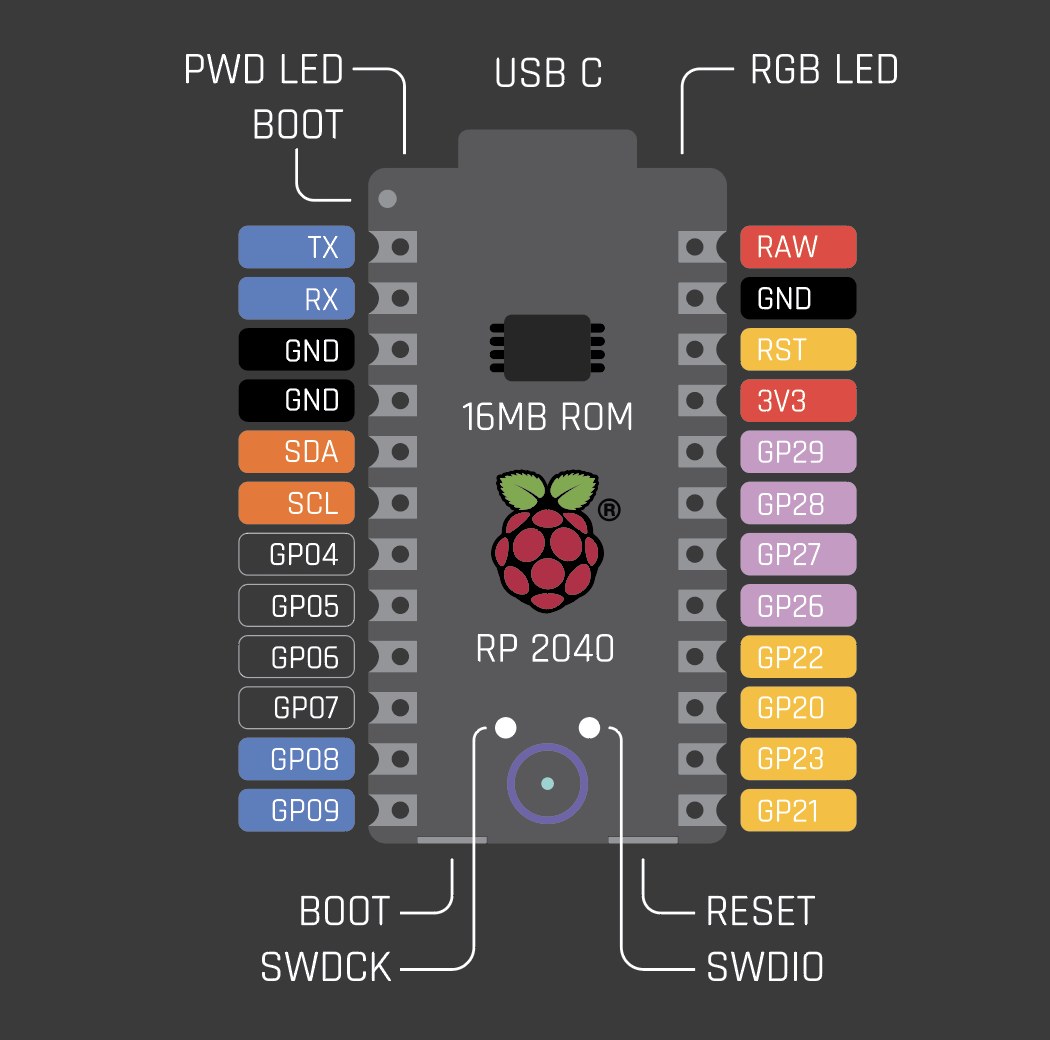
Main pro micro pins
| pin | gpio | capability |
|---|---|---|
| TX | GPIO0 | UART TX |
| RX | GPIO1 | UART TX |
| GND | GND | GND |
| GND | GND | GND |
| SDA | GPIO16 | I2c SDA |
| SCL | GPIO17 | I2c SCL |
| GP04 | GPIO4 | digital input and output. |
| GP05 | GPIO5 | digital input and output. |
| GP06 | GPIO6 | digital input and output. |
| GP07 | GPIO7 | digital input and output. |
| GP08 | GPIO8 | UART TX |
| GP09 | GPIO9 | UART RX |
| RAW | RAW | Raw usb voltage 5ish volts |
| GND | GND | GND |
| RST | RUN | Reset mcu |
| 3v3 | 3.3 voltage | 3.3 v from controller can be used to suply |
| GP29 | GPIO29 / ADC3 | digital input and output, with analogue-to-digital converter function |
| GP28 | GPIO28 / ADC2 | digital input and output, with analogue-to-digital converter function |
| GP27 | GPIO27 / ADC1 | digital input and output, with analogue-to-digital converter function |
| GP26 | GPIO26 / ADC0 | digital input and output, with analogue-to-digital converter function |
| GP22 | GPIO22 | SPI SCK |
| GP20 | GPIO20 | SPI CIPO |
| GP23 | GPIO23 | SPI COPI |
| GP21 | GPIO21 | SPI CS |
Other pins broken out.
| pin | gpio | capability | Location |
|---|---|---|---|
| Boot | Boot | tells the controller to boot from internal storage | top left most pin |
| SWCLK | SWCLK | Access to the internal Serial Wire Debug multi-drop bus | bottom left above Boardsource logo |
| SWDIO | SWDIO | Access to the internal Serial Wire Debug multi-drop bus | bottom right above Boardsource logo |
| RGB LED | GPIO25 | Connected to RGB LED | top right of board |
| RGB LED VSS | VSS | Next lead from RGB LED | Under RGB LED on backside of board |
Quickstart with Peg.
If your keyboard PCB has already been added to Peg, then you just have to plug in your book and select the correct PCB eg: Boardsource-Microdox_v2-blok-left. Then select the CIRCUITPY drive when prompted. Otherwise, If your chosen PCB has not been added to Peg then you will need to add it here are a link to the docs on how to do so.
CircuitPython overview and test code.
We like CircuitPython because of its lack of required knowledge and ease of use. So below we will get you going with a little bit of code that shows you how it works and you can play with it from there. It would be far too much to go over a c/c++ quick start be there are links for that below.
The lib folder
To use libraries in CircuitPython you need to include them with your code. To do so simply make a lib/ folder in the root of your CIRCUITPY drive, then you can place any library in that folder and import it like normal python. To download libraries you can get most of them from one zip that you can download here. For the below example no libraries are needed.
The Code
The code below will turn on the built-in RGB led and cycle colors. Edit your "code.py" or "main.py" to have this code in it and test it out.
import board
import neopixel
import time

num_pixels = 1
ORDER = neopixel.RGB
pixels = neopixel.NeoPixel(board.NEOPIXEL, num_pixels, brightness=0.2, auto_write=False, pixel_order=ORDER)
def wheel(pos):
    if pos < 0 or pos > 255:
        r = g = b = 0
    elif pos < 85:
        r = int(pos * 3)
        g = int(255 - pos * 3)
        b = 0
    elif pos < 170:
        pos -= 85
        r = int(255 - pos * 3)
        g = 0
        b = int(pos * 3)
    else:
        pos -= 170
        r = 0
        g = int(pos * 3)
        b = int(255 - pos * 3)
    return (r, g, b) if ORDER in (neopixel.RGB, neopixel.GRB) else (r, g, b, 0)

def rainbow_cycle(wait):
    for j in range(255):
        for i in range(num_pixels):
            pixel_index = (i * 256 // num_pixels) + j
            pixels[i] = wheel(pixel_index & 255)
        pixels.show()
        time.sleep(wait)

while True:
    rainbow_cycle(0.001)
After you save the file you will see how easy the flashing process is on the Blok using CircuitPython. No need to re-compile or re-flash simply make a change to the file and it will restart on save.